Facilitator guide
Case objectives, demonstration plans, debriefs, common mistakes and application checks across all 81 workplace cases and method lessons.
Download Facilitator guide PDF · 166 pages · 65.1 MB OPEXSTUDIO
Stock identity + FIFO + SMED. Follow the visual, practise a decision, then check your thinking.
Fictional teaching examples and AI-generated illustrations. Proposed changes and goals are not achieved results. Use the written instructions and check local conditions before applying a method.
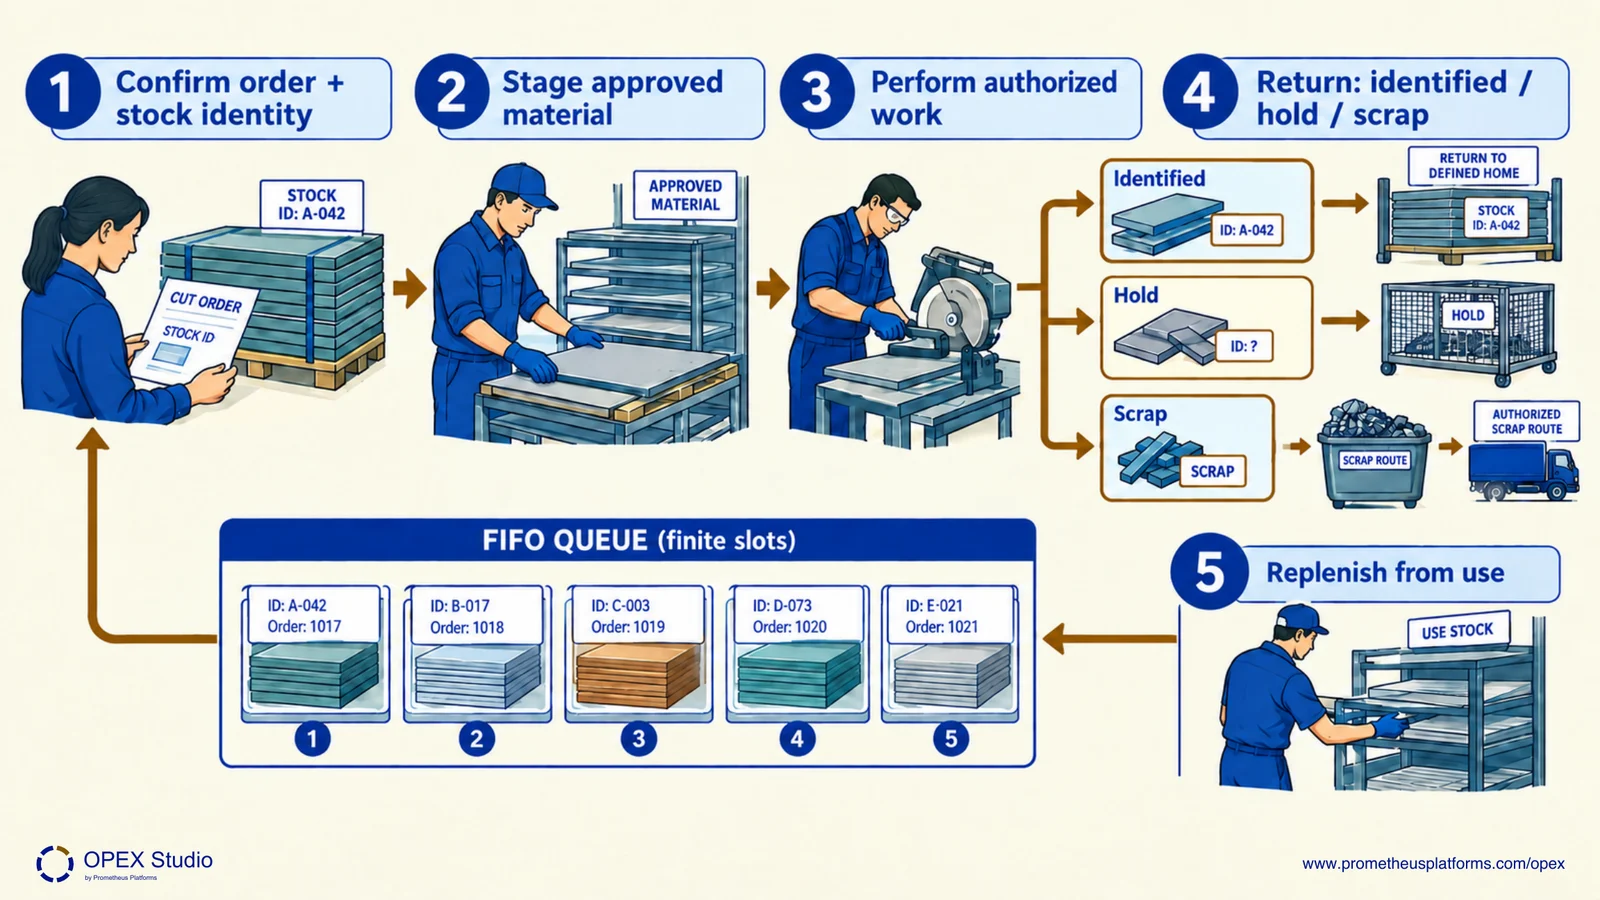
The retained fifteen order-preparation search observations have a 4.8-minute median and 2-minute goal. Preserve grade, identity and traceability through preparation and return. A FIFO lane controls sequence only when entry, exit, capacity and exception rules are defined. Unknown material must not be made usable by a new label alone. The clean floor and stock layout cannot prove coolant source correction or a safe cutting method.
Retained order-preparation search: 15 observations, median 4.8 minutes; proposed goal 2 minutes. It runs from released order to readiness of identified stock and verified preparation items.
Identified usable stock follows its approved return route; uncertain identity goes to hold; scrap follows authorized disposition. A new label alone cannot establish identity.
A FIFO lane needs entry, exit, capacity and exception rules. A full lane triggers the defined stop or escalation response.
What happens when the FIFO lane is full?
Use the agreed stop/escalation rule; do not add an untracked overflow pile.
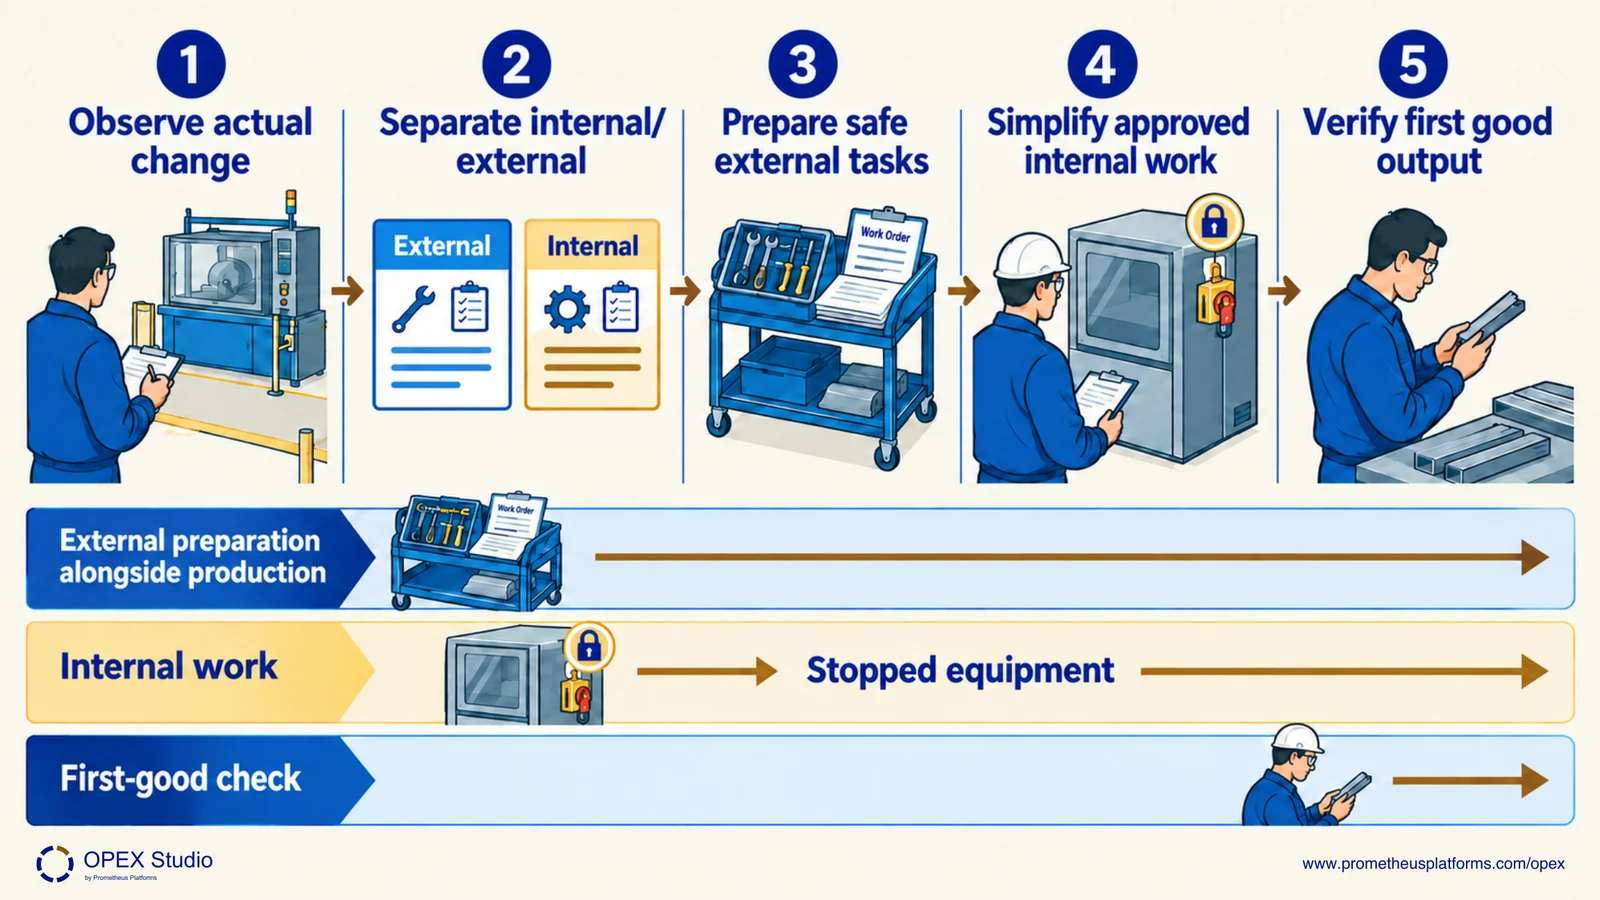
SMED studies changeover so suitable preparation can happen outside the machine-stopped period and necessary internal work can be simplified safely. It does not mean every setup must take one minute. Observe the actual change from last good output to first good output using a consistent definition. The saw case has no measured changeover dataset, so this page is an introductory teaching extension. Never reclassify a task as external if it needs isolation or another controlled state.
Observe the actual controlled change using a consistent last-good-output to first-good-output boundary. The case supplies no measured changeover durations.
Internal tasks require the controlled stopped state. Only technically safe, approved preparation may move outside that interval; isolation requirements remain authoritative.
SMED aims for single-digit minutes, not a universal one-minute setup. Verify first good output and the full approved method before claiming improvement.
Can all cleaning or adjustment be moved to while the machine runs to shorten downtime?
No. Follow task-specific authorization and energy controls; only genuinely safe, approved external preparation can move.
FIFO preserves arrival sequence through a finite lane. When the lane fills, the supplying process stops adding production until the consuming process releases capacity.
SMED aims for single-digit-minute changeovers. It distinguishes internal tasks requiring stopped equipment from external preparation and converts tasks only where technically and safely feasible.
Equipment servicing can expose hazardous energy. Task-specific training and applicable control procedures govern; generated workplace illustrations cannot authorize maintenance work.
Read the lessons online or use these PDFs to prepare, practise and review with your team. No sign-in needed.
Case objectives, demonstration plans, debriefs, common mistakes and application checks across all 81 workplace cases and method lessons.
Download Facilitator guide PDF · 166 pages · 65.1 MBPrintable case worksheets, blank observation records and five calculation exercises; answers are separate.
Download Learner workbook PDF · 169 pages · 10.7 MBReasoned sample responses, worked calculations and coaching guidance; fictional examples are clearly labelled.
Download Answer key and coaching notes PDF · 105 pages · 8.5 MBThe native method mechanisms and worked applications for all 68 detailed lessons, in a separate bookmarked portrait reference.
Download Method and application reference PDF · 141 pages · 10.2 MBFive illustrated system chapters: 15 Flare concept maps and 26 original workplace teaching cards, with links to all 81 supporting cases and method lessons.
Download Illustrated systems atlas PDF · 69 pages · 55.8 MBStage verified preparation items before handover, but keep search time distinct from complete technical changeover.
Explore the connected method →Recurring residue should create a condition record and qualified response, followed by a comparable recurrence check.
Explore the connected method →